11.15.2011

Corbels

The house I grew up in was always decorated beautifully. My mother, who loves Colonial Decor, (for its timelessness and richness) decorated the majority of our home with this flare in mind. For those of you who aren't familiar with what Colonial Decor is, it is a style of furniture inspired by the 17th & 18th Century, when America was being Colonized by Europe. The easiest way I can explain it is, "Not as frilly as Victorian, but not as rustic as Country...somewhere in the middle." In my mothers house, there is a lot of wood pieces and rich colours, but that may also be in large part due to the fact that jewel tones were very trendy in the 90's when she did her decorating. While I used to make fun of my mom for loving this style and urged her to update her home and go for a more modern look, she remains true to still loving Colonial Decor. Now that I am in love with decorating and go for a Traditional look, which is the bridging of the old with the new, there are elements of my moms house that I now love and want to replicate. For example, the corbels mounted in her doorway are one of these things.

 They are not unique to the Colonial period, as they have been used since Ancient times to glam up the exterior and interior appearance of buildings. They can be carved out of stone and wood, or molded out of plaster and they can be found in Rustic, Victorian, Traditional, and even Modern Homes. 


Colonial Corbel

Rustic/Country Corbel

Victorian Corbel

Modern Corbel

Exterior Corbel in Ancient Architecture
As you can see, a corbel is a decorative pieces that can be found mounted on the inside corners in door frames, fireplaces, under tables, on kitchen islands, under or above cabinets, shelving and even hang from ceilings.


My house is a Century Home, and I am shocked to say, we do not have any corbels....But not for long! They have become the inspiration of my next project (The Laundry Room) and I cannot wait to get started. While antique corbels can be quite expensive, Home Depot sells them from $10-$20 a piece. Best part, they are almost weightless as they are made from foam. Once mounted and painted you would never know the difference and they look like they belong to the house. Stay tuned as I tackle my next project and give this house its first set or Corbels!

11.14.2011

Dining Room turned Family Room

In previous decades this room had been used as a fancy Living Room. During my husbands childhood this room had been turned into a Dining Room. However, because it was a room that only had the opportunity to be used a few times a year, it eventually turned into a room that was almost never entered and slowly became a hoarding den! The walls had been papered cranberry red with a boarder running along the ceiling in a paisley pattern. This made the room very dark and gloomy. I decided it needed a face lift. It already had great potential as it had beautiful stained glass windows above the bay window, nice think trim, and sliding wood doors. I decided I wanted to brighten it up and use this room on a regular basis, not only because it could be beautiful but because the flow of our house depended on it. So it became our television room or Family Room. The space beyond the wood sliding doors wasn't really quite big enough to be its own room as it sat between this room and the front entrance hallway. I decided to leave the wood doors open at all times and allow the family room to spill into that joining room. It now works as an office/den space.

Changes Needed

  • Wall Detail: Textured Cranberry Wallpaper, Paisley print border
  • Lighting: Pink Glass with Gold detail ceiling light
  • Furniture: Bragg Antique Sofa, and dining room table

Changes
  • Wall Detail: Textured Cranberry Wallpaper Painted light green, Lion-Behr - HomeDepot
    • border: Paint-able white molded paper - HomeDepot
  • Lighting: Stainless Steal chandelier - Lowe's
    • 2 table lamps- Home Sense
  • Furniture: 2 Faux Swede Sofas, 1 Sofa Chair, Sage Green- The Brick
    • 2 Wood End Tables- Home Sense
    • Leather Ottoman- BouClair
  • Window Treatment: California Blinds, White- HomeDepot
    • 2 Panels of Ready to Hang, Loft Size Curtains, White -Walmart
Before 

 
 Afters


Living Room Update

This room in previous years had always been used as a casual room where family would gather to watch television. It has a beautiful bay window, a large fireplace, original wood floors from the early 1900's and nice crown molding. Due to the fact that this room already had these wonderful features, I wanted to glam it up a bit. I thought it would make a great living room for guests to gather, as it is directly off from the kitchen. However, my biggest challenge; I was not allowed to paint out the original wood trim. Rather than fight with it, I made it work to my advantage!


Changes Needed
  • Wall Detail: 1980's  Dusty rose pink  wall paper with blue floral design.
  • Crown Molding: painted stripe, Baby Blue
  • Curtains: Lace
  • Couches: Blue wing back, reclining sofas
  • Wood furniture: Honey 
  • Accessories: pink and blue

Changes
  • Wall Detail: Paint, chocolate brown- Behr, Homedepot
    • Accent Wall: Damask Print wallpaper -The Wallpaper Company
  • Crown Molding: Painted out white
  • Curtains: Ready to hang "Loft Size" curtains (6 panels), Cream- Walmart
  • Couches: Faux Swede, Cream- The Brick
  • Coffee Table and End Tables- Wilson's Furniture
  • Accessories: Crystal, Silver and Olive Green- Home Outfitters, JUSK, Home Sense, Michaels, Winners, Bowrings, Urban Barn.

Before


After


11.13.2011

Kitchen Update

This room was one of the first projects I tackled in the house. It was spacious with lots of cabinets storage, long counters and could handle a large dining table. Being set directly off from both entrances it had to be an inviting space. As a person who enjoys entertaining and hosting family holidays, I knew this was a room where people would be spending a lot of time when they would visit. Not to mention, I love cooking and baking and I needed to love being in this room myself. We knew within the next 5 years we would be gutting it out and completely rebuilding it, so for the time being, I needed a quick fix to make it look presentable. I didn't want to sink big money into this room if it was going to be ripped out in a few years, so I had to be creative!

Needed Changes 
  • Cabinets: 1970's fake wood design, yellow bubbled glass inserts
  • Counters: 1970's fake marble design, gold and cream design
  • Back Splash: Same as counters
  • Hardware: 1970's dark brass antiqued handles
  • Floor: 1980's Linoleum white floor with blue checker detail  
  • Wall Colour: Gold   
Quick Fixes
  • Cabinets: Painted, Carbonite- Pratt & Lambert Paints
  • Counters: Painted standard black, top coat with Verithane
  • Back Splash: Tilled wallpaper- HomeDepot
  • Hardware: Stainless Steal nobs- HomeDepot
  • Floor: Original flooring, covered with area rug
  • Wall Colour: Painted, Aviator Silver- C.I.L. Paint, Accent wall: Painted, Swordplay- C.I.L. Paint- HomeDepot 
  • Accessories: Walmart, Carriage House Antiques, Home Sense, Bowrings. 
Before


After


10.28.2011

Elegant Pumpkin's
  
For the most part, I would have to say that I am a very traditional person. In fact, even when it comes to decorating, my favourite look for a room is "Traditional," apposed to "Retro" or "Modern" where the atmosphere can become very cold. However, when it comes to decorating pumpkins, I wanted to leave the traditional pumpkin carving and try something totally different this year. I did a little bit of research and stumbled upon some really cool ideas (most of which eliminate the messy part). They inspired me, so I thought they may also inspire you!


The Lace Pumpkin 
Probably the easiest way to accomplish this look is to use lace stocking!


The Diamond Pumpkin
Get the diamond look by gluing on rind-stones.

 Glitter Pumpkin's 
Slap on some glue and roll the pumpkin in some fairy dust. (hair spray might always work)

 Initials or Monogrammed Pumpkin's
Rather than carving a face, get a stencil for some pretty letters.

 Bead Work Pumpkin's
 Create a cool motif/design using beads or in this case, thumb tacks.

The Painted Pumpkin
Paint on a design or picture for a clean look! 

10.26.2011

The Mud Room


This is a room that I began envisioning back a year ago. My aunt and I were in a Winner's (my aunts favourite store) shopping and we found these pillows. Of course, what caught our attention was the embroidered birds on the front (If you didn't already know, I live on a farm that specializes in birdseed production). Immediately I was drawn to the black and white ones while my aunt, to no surprise, was drawn to the turquoise set. I knew I had to have these pillows and so I decided I would have to decorate a room to display them properly. Immediately I decided I would decorate the front add-on room to our home. Previously it had been used as a "Sun Room" for reading or sipping tea. The one downfall, it had never been insulated. Therefore, its freezing in the winter and sweltering in the summer. So, due to the fact that it is a room that people usually enter and quickly pass through, I thought I would change its function and make it a "Mud Room."   


Not long after I had bought those pillows, my aunt and I were shopping at the store Urban Barn (my favourite store) and we found more black and white pillows with birds printed on them. These were slightly different then the pillows from Winner's and they would compliment perfectly! To my surprise she bought them for me as a birthday gift.


I also found some very inexpensive pillows at the store JYSK. They were tone-on-tone black and had a raised velvet damask print on them...SOLD!!!


This summer after we started de-cluttering that room, I was shocked to see how big that space really was. It had always been so full of unwanted furniture and junk. At times, it even resembled a closet space with a little pathway carved out to walk into the house. Once empty, we were happy to see we had 110 square feet to play with.


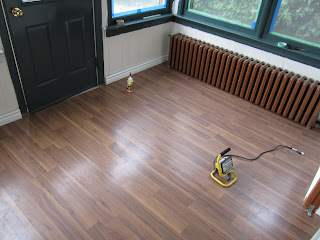
The walls were wood paneling from the 60's and the flooring was a bluish gray carpet glued down at some point in the 80's. The worst part would be the trim that framed the windows and doorways, as it was painted hunter green.  Needless to say, all of these features were going to be replaced! I selected a nice warm white colour called "Swiss Coffee" by Behr Paint and away I went. My precious puppy Freddy also thought he would contribute to the room by knocking over the gallon of paint. This meant the carpet was coming up sooner than later. We picked an inexpensive laminate floor, similar in stain colour to the original wood flooring that ran throughout the house. After a long day of instillation, contributed by our great friends, the room was beginning to come to life. 


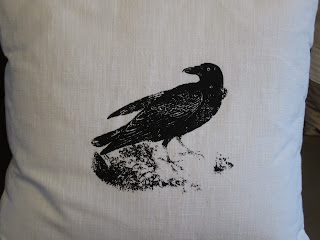
   Where it all began! The black and white pillows from Winners


    Black and white pillows from Urban Barn


      Black tone-on-tone, velvet raised damask pillows from JYSK


 Awesome pillows I found at Walmart for $5 each...reversible sides...couldn't resist!


   The room moments after the bluish gray carpet was pulled up.


    Beauty! Glue on cement....and hunter green trim.


                 After the laminate flooring was installed by my friend Alex Purich.


               After about 4 or 5 coats of white, the green trim is finally covered


 The dirtiest part is almost over. The radiator will not be fun, but the end is in sight!!!